NotesnookHELP
Editor Toolbar
The notes editor toolbar has all the basic tools for rich formatting of your notes. It also lets you add various blocks to your notes like task lists, images, videos etc.

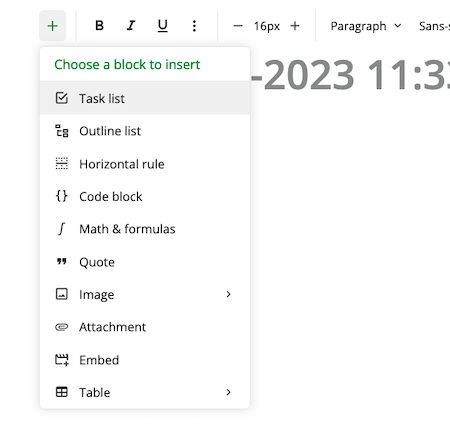
Adding blocks to a note
- Focus inside the note where you want to insert a block.
- Click on the
 button on the toolbar.
 - Select the block you want to insert; for example a task list.
Customzing editor toolbar
Toolbar configuration is automatically synced across all your devices.
One of the great features of the editor is the ability to customize the editor toolbar to fit your own needs. There’s usually many tools in an editor toolbar and being able to hide the tools you never use and just keep what you use more frequently on top helps focus on your note taking.
To customize the toolbar go to Settings > Editor Settings and click on Configure Toolbar.
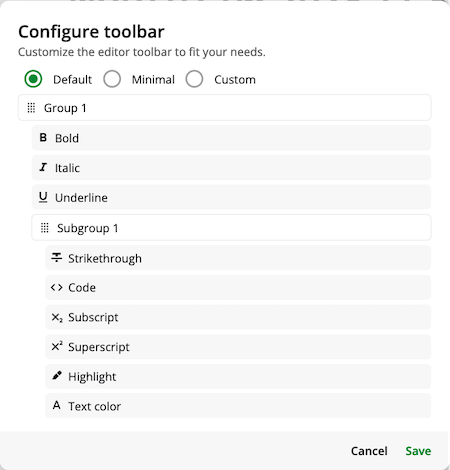
To customize the toolbar go to Settings > Customization > Editor and click on Configure Toolbar.
Groups - Tools are distrubted across groups. You can add, remove and reorder the groups in the toolbar. You can move tools between groups with drag and drop.
Subgroup - Each group can have a single sub group. Tools in a subgroup are collapsed into a drop down menu in the toolbar.
Disabled Items - Tools that are hidden from the toolbar. You can drag and drop a tool into this section to remove it from the toolbar.
Disabled Items - Tools that are hidden from the toolbar. Click on the + button on a group to view disabled tools and add them back to the toolbar.
Add a new group
To add a new group to the toolbar, click on the + button in the header.
Scroll down the bottom of all groups. Click on Create a group button to add a new group.
Adding tools to a group
Drag and drop tools from other groups or the Disabled item section into a group to add them to the group.
Click on the + button on a group header to add any disabled tools into the group. You can also drag and drop tools from other groups.
Creating a subgroup
- Hover on a group header.
- Click on the
+button to add a subgroup. - Drag and drop tools into the subgroup.
- Tools in the subgroup will be collapsed into a drop down.
You can create a subgroup by clicking on collapse button on a tool. Tools in the subgroup will be collapsed into a popup.
Deleting a group
You can remove a group and all it’s tools from the toolbar.
- Hover on a group header
- Click on the trash icon to delete the group.
- All the tools in the group will be moved to
Disabled itemssection at the bottom.
- Click on the
-button on a group header to remove the group - Tools removed from a group can be added back with the
+button on the group header.
Disable a tool
- Hover on a tool header
- Click on the trash icon to disable the tool.
- Deleted tools in the group will be moved to
Disabled itemssection at the bottom.
A tool can be disabled from the toolbar by clicking on the - button on the tool.